So the kitchen needed a lot of work, mostly elbow grease and paint, to make it livable. There are some other before photos of the kitchen in a previous post, but below are some photos of the American Kitchen’s steel sink cabinet you haven’t seen yet. I’m pretty sure its original to the house. These were very popular post-WWII. A lot of manufacturers had surplus steel lying around after making war goods and decided to make household goods with them. These types of cabinets were thought to be less susceptible to pests and very durable. But these were not made of stainless steel, so they will rust, and also they are metal, so they are loud. It is a really well-made piece and while its clearly been abused, its holding up like a champ for being nearly 70 years old! I have a lot of respect for this cabinet and sink.

The Kitchen – Before
You may notice the trim around the bottom of the upper cabinets. In the wooden cabinet to the left of the steel cabinet there was evidence of many evaporated puddles of water. The trim was never caulked, so water was able to drip down the side and onto the floor. Not good.

Another Before View – Note the filth
As it turns out, the little stickers on the cabinet are covering some scratches, but at some point, someone painted over the thing with latex paint too. I decided to sand it down a little and spray paint it. Initially, I was going to keep it white, but on whim decided to go with this teal color. The tiles are caulked and water shouldn’t be dripping down the side of the cabinets and onto the floor anymore. I also purchased a new faucet with an integrated sprayer, but I haven’t installed it. I may return it and just live with this one for now. We’ll see if the shallow sink gets on my nerves over time. I’m surprised how much I’ve come to like that huge drainboard, so maybe I’ll come around on the sink.
I feel like I’m keeping with the spirit of the house, while modernizing it.

Teal Base Cabinets
I’m glad I kept the hardware from the old cabinets I removed. I was able to clean up all the old paint and grime off of one of the old chrome knobs and re-use it on the cabinet door. I still need to touch up a few places (and put away my dishes), but its a huge improvement. All-in-all this cost me about $80 in paint (including the gallon and a half of Killz to cover the room) and paint supplies, about $30 in tile and tile supplies, and a lot of elbow grease. Not too shabby.

Trying to inspire my little house to see itself as it will be.
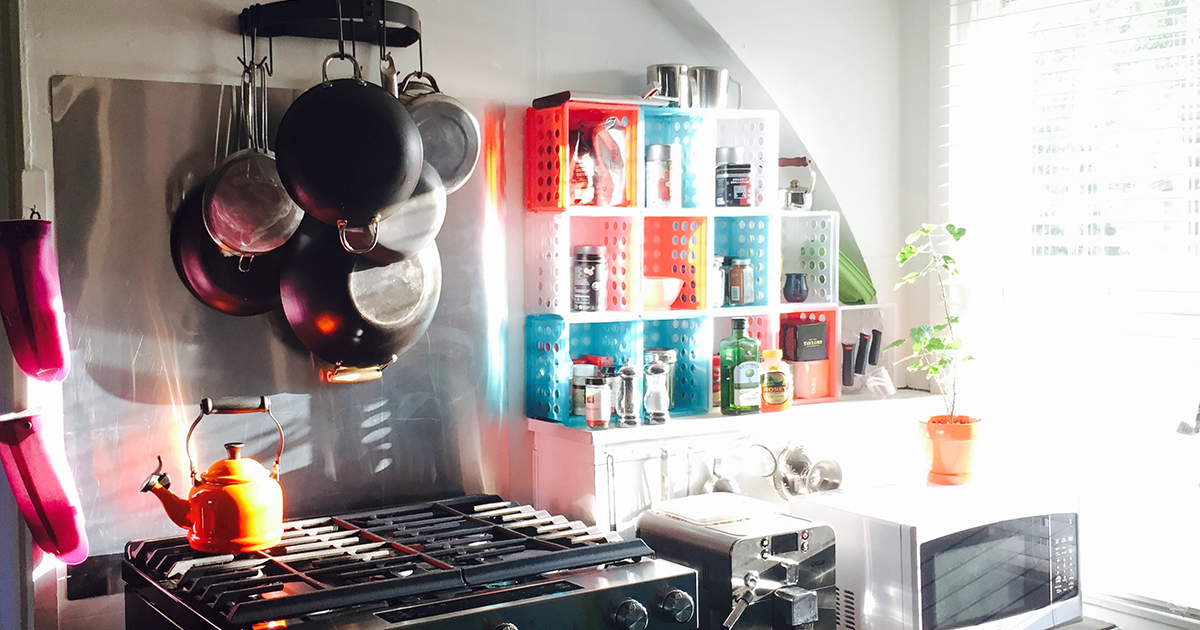
On the stove side, since I don’t have a hood right now, I thought a pot rack would be an efficient use of the space. I also picked up these little plastic crates at Target, $3 for 3, not only do they add some color to the wall, they keep all the stuff I use often, organized. I’m also very happy with the continuous grate on my range, I find that when I’m not using the stove it becomes counter top space. I can put a cutting board on there, and chop! Also, since this is the slide-in range I purchased for the permanent renovation, I don’t have a back splash or side cabinets to cover the sides. But since this mini-reno is temporary, I also didn’t want to spend a lot of money on a solution for around the stove. I purchased some spray adhesive and and 3ft x 3ft sheet of stainless steel. I rounded out the corners with a pair of scissors and less than $20 and 30 minutes later, I had a back splash. This will make it a lot easier to cleanup splatter and my pots and pans won’t mark up the wall. Altogether, not counting the cost of stove, this side cost me about $5 in tile, $12 in plastic crates, $35 for the pot rack, $20 for the back splash and $20 for the white faux-wood blinds.
A Very Sunny Kitchen!
So for about $200, the kitchen is definitely livable now.
